Article Settings
Once Geek Article Utilities Plugin is installed and enabled, you will see the new tab named "JoomlaGeek" in article setting form. If you do not see this tab, please ensure that you have enabled the setting "Show Article Options" in Content component setting form.

| Setting |
Default |
Description |
| Enable Article Utility |
Enabled |
Enable or Disable Article Utility for this article

|
Basic Settings
| Setting |
Default |
Description |
| Enable in Window Popup |
Yes |
Enable if the page is opened in Window Popup (tmpl=component)
|
| Integration mode |
Manual |
Select an integration mode to enable Article Utility.
- Manual (default): If you select this mode, you have to enable/disalbe (depend on value of Default mode setting is Disalbed or Enabled) popup for each articles in article setting form.
- Automatic: this mode will automatically enable Article Utility for articles that you selected with filtering settings.
| manual | Manual |
| auto | Automatic |
|
| Default Mode |
Enabled |
If Enabled then Article Utility will be enabled for all articles by default, and you have to disable each article manualy and otherwise if Disabled is selected.
|
| Category Filtering Type |
Inclusive |
Select Inclusive to Include the Selected Categories, Exclusive to Exclude the Selected Categories.
|
| Categories |
|
Select one ore more cateogires
|
| Include Sub Categoires? |
Yes |
Include or Exclude Sub articles from Child Categories of selected categories.
|
Addthis settings
Addthis settings
| Setting |
Default |
Description |
| Enable Addthis |
No |
Enable Addthis buttons
|
| Position |
Before Article Body |
Select a postion to display addthis buttons
| beforeArticleBody | Before Article Body |
| afterArticleBody | After Article Body |
| onContentBeforeDisplay | Before Content |
| onContentAfterDisplay | After Content |
|
Disqus settings
Disqus settings
| Setting |
Default |
Description |
| Enable Disqus |
No |
Enable Disqus buttons
|
| Disqus Shortname |
|
Enter a Disqus shortname |
| Position |
After Content |
Select a postion to display disqus buttons
| afterArticleBody | After Article Body |
| onContentAfterDisplay | After Content |
|
Facebook settings
Facebook settings
| Setting |
Default |
Description |
| Open Graph Tags |
Enabled |
When someone shares content from your site to Facebook, our crawler will scrape the HTML of the URL that is shared. On a regular HTML page this content is basic and may be incorrect, because the scraper has to guess which content is important, and which is not. Take control of what the Facebook crawler picks up from each page by using Open Graph meta tags. These tags provide structured info about the page such as the title, description, preview image, and more.
|
| Enable Facebook Comment |
No |
If Yes, it will display Facebook Comment box at the bottom of the Article. IMPORTANT: Facebook APP ID is required to display comment box.
|
| Facebook App ID |
|
The unique ID that lets Facebook know the identity of your site. This is crucial for Facebook Insights to work properly. |
| Width |
100% |
The width of the plugin. Either a pixel value or the literal 100% for fluid width. The mobile version of the Comments plugin ignores the width parameter, and instead has a fluid width of 100%. |
| Color Schema |
Light |
Select a Color Schema
|
| Number of Posts |
10 |
The number of comments to show by default. The minimum value is 1. |
| Order By |
Social |
The order to use when displaying comments.
| social | Social - Also known as "Social Relevance": The Comments plugin uses social signals to surface the highest quality comments. Comments are ordered to display the most relevant comments from friends and friends of friends as well as the most-liked or active discussion threads. Comments marked as spam are hidden from view.
|
| reverse_time | Reverse Time - Comments are shown in the opposite order from which they were posted, with the newest comments at the top, and the oldest at the bottom. |
| time | Time - Comments are shown in the order in which they were posted, with the oldest comments at the top, and the newest at the bottom. |
|
| Position |
After Content |
Select a position to display Facebook Comment box
| afterArticleBody | After Article Body |
| onContentAfterDisplay | After Content |
|
How To Get An App ID From Facebook
In order to get an App ID and Secret Key from Facebook, you’ll need to register a new Facebook application. Don't worry – its very easy, and your application doesn't need to do anything. We only need the keys.
There are 4 simple steps to creating a Facebook App, which we've outlined below.
Step One: Visit The Facebook Developers Page
To start with, navigate your browser to the Facebook Developers page. You'll be asked to login to your Facebook account.
Once logged in, you’ll see a screen similar to this:
 Click the "Add a New App" to start create a new app.
Step Two: Choose Website as Your App's Platform
 This is the popup you will see when you click Add a New App – select Website to Continue.
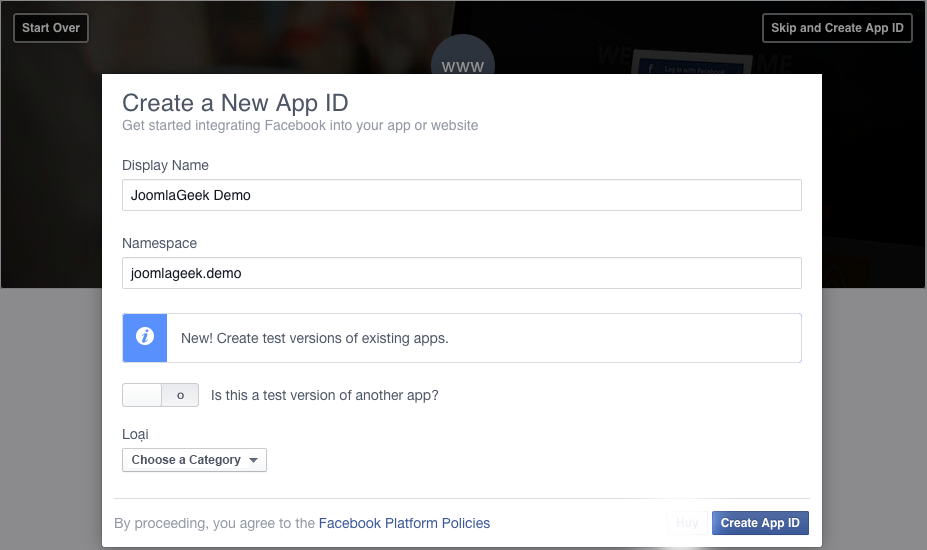
Step Three: Update Your App Information

After you fill out the requested fields, click the "Create App ID" button — this will take you to a page where you retrieve your info.
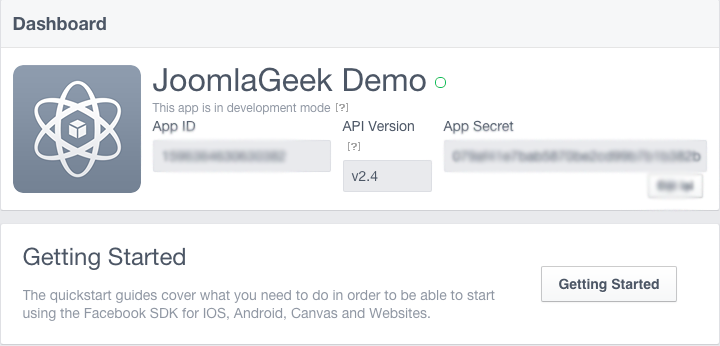
Step Four: Get Your Keys

Copy and paste the App ID and App Secret Key into the module settings form, and save your changes.


 Click the "Add a New App" to start create a new app.
 This is the popup you will see when you click Add a New App – select Website to Continue.


